Verilog RTLのデザインをSCV(SystemC Verification Library)で検証する環境のサンプルです。

サンプルの動作環境
このサンプルは次の環境で動作を確認しました。
- OS: CentOS7.7
- Icarus Verilog: 11.0
- SystemC: 2.3.3
- SCV: 2.0.1
サンプルの概要
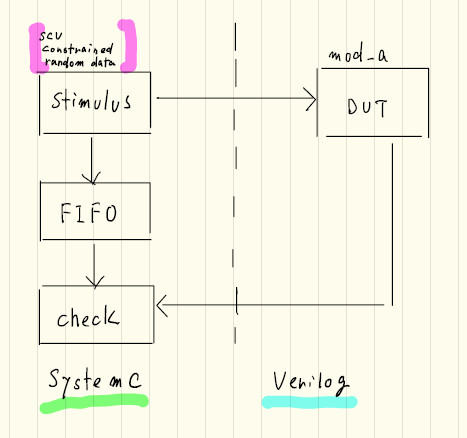
サンプルの基本的な構成は、Icarus VerilogとSystemCの連携(VPI)と同じです。Verilogでインスタンス化したmod_aという簡単なRTLに対して、SVCでランダムデータの入力を行い、SystemCでRTLの出力とリファレンスデータの一致確認を行っています。
DUTのmod_a.vは、8ビットの2入力を内部で加算して出力する単純な回路です。
module mod_a (
  input        clk,
  input        rst_x,
  input        i_valid,
  input  [7:0] i_in_a,
  input  [7:0] i_in_b,
  output reg   o_valid,
  output reg [7:0] o_out
);

always @(posedge clk or negedge rst_x) begin
  if (~rst_x) begin
    o_valid <= 1'b0;
    o_out <= 8'h0;
  end else begin
    o_valid <= i_valid;
    o_out <= i_in_a + i_in_b;
  end
end

endmodule
ランダムデータ用の構造体
RTLのDUTは、i_valid, i_in_a, i_in_bという3つの入力があります。この入力データをランダムに生成するために、data_tという構造体を定義します。
struct data_t {
  sc_uint<1> valid;
  sc_uint<8> a;
  sc_uint<8> b;
};
data_tに対応するscv_extensions<data_t> classを作成します。
#ifndef DATA_EXT_H
#define DATA_EXT_H

#include "scv.h"
#include "data.h"

template<>
class scv_extensions<data_t> : public scv_extensions_base<data_t> {
public:
  scv_extensions<sc_uint<1> > valid;
  scv_extensions<sc_uint<8> > a;
  scv_extensions<sc_uint<8> > b;

  SCV_EXTENSIONS_CTOR(data_t) {
    SCV_FIELD(valid);
    SCV_FIELD(a);
    SCV_FIELD(b);
  }
};
#endif //DATA_EXT_H
コンパイルスクリプト
SystemC関連のソースファイルは、g++で事前にコンパイルしておき、iverilog-vpiでVPI用のCファイルとリンクさせます。-lscvオプションが必要です。
# compile verilog
iverilog -c ../bin/cmd.txt \
    -v \
    -y ${RTL_DIR} \
    -o ${TOP_MODULE} \
    ${sim_file}

g++ -c -fPIC \
    -I${SYSC_DIR} \
    -I${STUB_DIR} \
    -I${SYSTEMC_DIR}/include \
    ${SYSC_DIR}/mod_a.cpp

g++ -c  -fPIC \
    -I${SYSC_DIR} \
    -I${STUB_DIR} \
    -I${SYSTEMC_DIR}/include \
    ${SYSC_DIR}/mod_a_tb.cpp

iverilog-vpi \
    -I${SYSC_DIR} \
    -I${STUB_DIR} \
    ${STUB_DIR}/vpi_stub.c \
    mod_a.o mod_a_tb.o -lscv -lsystemc -L${SYSTEMC_DIR}/lib-linux64
# simulation
export LD_LIBRARY_PATH=${SYSTEMC_DIR}/lib-linux64
vvp -M. -mvpi_stub ${TOP_MODULE} -v
ランダムデータの生成
mod_a::stimulus()内でランダムデータを生成しています。制約条件のあるランダムデータを生成する場合は、 scv_constraint_baseを派生させた制約条件のクラスを作成する必要があります。
SCV_CONSTRAINT
SCV_CONSTRAINTを使うと、「ランダムかつi_in_aとi_in_bを同じ値にする」といった制約条件を指定することができます。
class my_constraint1: public scv_constraint_base {
public:
  scv_smart_ptr < data_t > p ;
  SCV_CONSTRAINT_CTOR(my_constraint1) {
    SCV_CONSTRAINT ( p->a() == p->b() );
  }
};
keep_only
keep_onlyを使うと、ランダムデータの生成範囲を指定できます。
class my_constraint2: public scv_constraint_base {
public:
  scv_smart_ptr < data_t > p ;
  SCV_CONSTRAINT_CTOR(my_constraint2) {
    p->a.keep_only(1,7);  // aは1~7の範囲
    p->b.keep_only(8,15); // bは8~15の範囲
  }
};
mod_a::stimulus()
ランダムデータを生成するには、scv_smart_ptr()もしくは制約条件を指定したclassをインスタンス化します。ランダムデータは、next()メソッドをコールすると生成されます。次の例は、scv_smart_ptr, my_constraint1, my_constraint2, my_constraint3という順で、それぞれ5回のランダムデータ生成を行っています。 RTLへのデータの書き込みは、ランダムデータ生成後に行っています。
void mod_a::stimulus() {
  scv_smart_ptr<data_t> data_p ("data");
  my_constraint1 c1("const1");
  my_constraint2 c2("const2");
  my_constraint3 c3("const3");
  scv_random::set_global_seed(100);
  while (true) {
    while (rst_x.read() == 0)
       wait();
    cout<<"#"<<sc_time_stamp()<<" rst_x is deasserted " << endl;
    // no constraint
    for (int i = 0; i < 5; i++) {
      data_p->next();
      scv_out << "Random value for " << std::hex << data_p->get_name() << ":" << endl;
      data_p->print(scv_out, 0, 2);
      // RTLにランダムデータをセット
      i_valid.write(data_p->valid.read());
      i_in_a.write(data_p->a.read());
      i_in_b.write(data_p->b.read());
      wait();
    }
    // constraint1
    for (int i = 0; i < 5; i++) {
      c1.p->next();
      scv_out << "Random value for " << std::hex << c1.p->get_name() << ":" << endl;
      c1.p->print(scv_out, 0, 2);
      i_valid.write(c1.p->valid.read());
      i_in_a.write(c1.p->a.read());
      i_in_b.write(c1.p->b.read());
      wait();
    }
    // constraint2
    for (int i = 0; i < 5; i++) {
      c2.p->next();
      scv_out << "Random value for " << std::hex << c2.p->get_name() << ":" << endl;
      c2.p->print(scv_out, 0, 2);
      i_valid.write(c2.p->valid.read());
      i_in_a.write(c2.p->a.read());
      i_in_b.write(c2.p->b.read());
      wait();
    }
    // constraint3
    for (int i = 0; i < 5; i++) {
      c3.p->next();
      scv_out << "Random value for " << std::hex << c3.p->get_name() << ":" << endl;
      c3.p->print(scv_out, 0, 2);
      i_valid.write(c3.p->valid.read());
      i_in_a.write(c3.p->a.read());
      i_in_b.write(c3.p->b.read());
      wait();
    }
    i_valid.write(0);
    wait(10);
    sim_done = true;
    std::cout << "=======================================" << std::endl;
    std::cout << " The simulation is successfully done." << std::endl;
    std::cout << "=======================================" << std::endl;
    wait();
  }
}
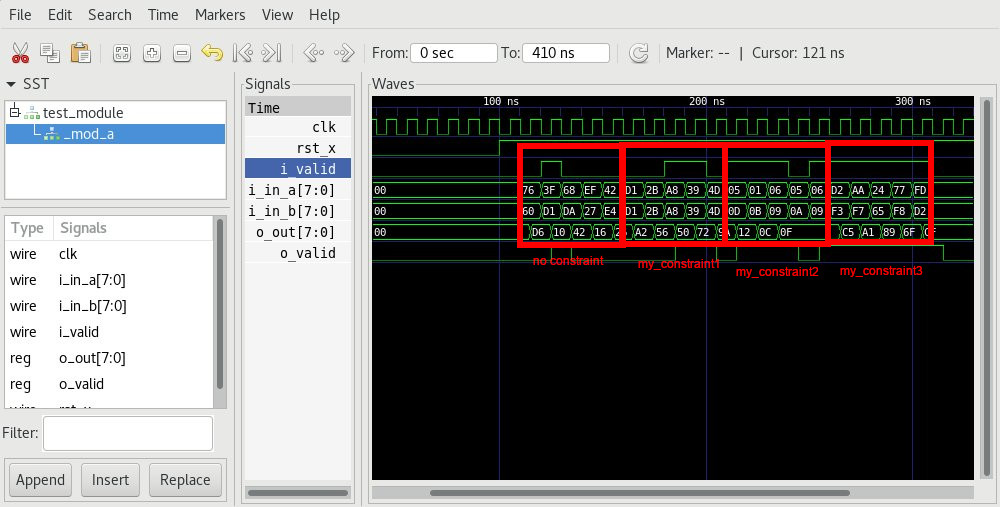
実行結果
シミュレーションを実行すると、次のようなログが表示されます。SCVで生成されたランダムデータでDUTが動作しているのが分かります。
Icarus Verilog started
VCD info: dumpfile dump.vcd opened for output.
#0 s SystemC started
#100 ns rst_x is deasserted
Random value for data:
  {
    valid:0
    a:76
    b:60
  }
Random value for data:
  {
    valid:1
    a:3f
    b:d1
  }
(中略)
Mon Input: #270 ns i_valid = 1 i_in_a = 0aa i_in_b = 0f7
Mon Output: #270 ns o_valid = 1 o_out = 0c5
Random value for :
  {
    valid:1
    a:77
    b:f8
  }
Mon Input: #280 ns i_valid = 1 i_in_a = 024 i_in_b = 065
Mon Output: #280 ns o_valid = 1 o_out = 0a1
Random value for :
  {
    valid:1
    a:fd
    b:d2
  }
Mon Input: #290 ns i_valid = 1 i_in_a = 077 i_in_b = 0f8
Mon Output: #290 ns o_valid = 1 o_out = 089
Mon Input: #300 ns i_valid = 1 i_in_a = 0fd i_in_b = 0d2
Mon Output: #300 ns o_valid = 1 o_out = 06f
Mon Input: #310 ns i_valid = 0 i_in_a = 0fd i_in_b = 0d2
Mon Output: #310 ns o_valid = 1 o_out = 0cf
=======================================
 The simulation is successfully done.
=======================================
#410 ns SystemC stopped

Info: /OSCI/SystemC: Simulation stopped by user.